Thursday, April 17, 2014
Friday, March 21, 2014
Photo Stream it Up!
I am sick and tired of wasting time trying to keep classroom photos up to date on my website. I need a quick easy way to post my pictures without downloading, uploading, etc... If you've been following my blog you know I HATE wasting time. So, here's my latest solution (if you are an Apple product user)
Follow the instructions below. Then, link your Photo Stream site onto your webpage (ONCE!) and you will always have live, up to date pics!
Now your photos on your web-page will update easily and instantly right from your iOS device!
Was this helpful? Would you like more screen shots? I'd love your feedback!
Questions? Tweet to @jpanga10 Tweet
From an iOS Device (iPad, iPhone)
- Open up Photos
- Click on the Shared Tab (at the bottom in the middle)
- Click on the + sign in the upper left-hand corder
- Name your photo stream, Push Next
- Now, you have the option of adding other iCloud users to your photo stream. If you add other users they will be able to view your photo stream on their phone, iPad, or iPhoto on their MacBook. Since you are making this photo stream public it's up to you if you include anyone
- Select Create
- Now you will see your new photo stream appear in your list under Activity. Select it.
- At the bottom you will see two tabs, select the People tab
- Select the tab next to Public Website and make it green.
- Select share link and email it to yourself (So that you will have it later to add into your website).
- Return to the Photos Tab at the bottom.
- When you click on the + square you will be able to insert photos straight from your camera roll. You can add comments about the pictures for parents!
- Your last step is to add your link to your webpage. If you are using SchoolWires, please feel free to use my tutorial video found at www.dps61.org/techresources under the Web101 tab.
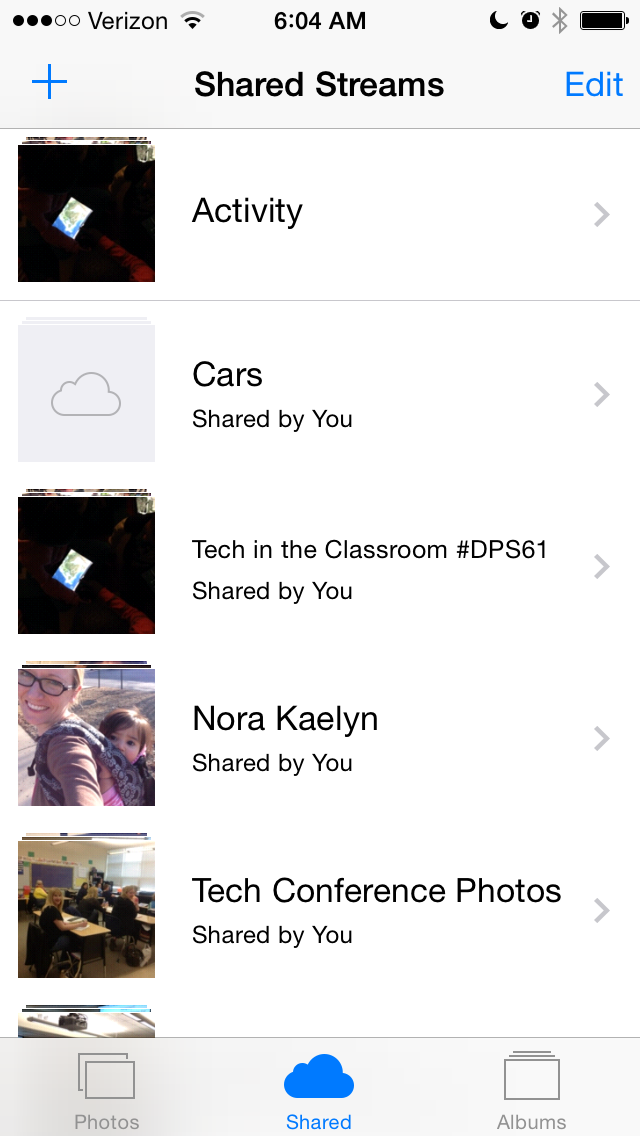
Now your photos on your web-page will update easily and instantly right from your iOS device!
Was this helpful? Would you like more screen shots? I'd love your feedback!
Questions? Tweet to @jpanga10 Tweet
Wednesday, March 12, 2014
Bitly
 I am in LOVE with bitly. I think of it as a cloud-based favorites bar for my Internet sites. I save ALL web resources in bitly so that I can access them anywhere. Bitly also creates tiny URLs and QR codes.
There's also an app http://bit.ly/BitlyAppLink (free).
Quick Directions to Get You Started (I always do promise Quick and Easy!)
1. Go to https://bitly.com
2. Create a free account or log in with Facebook or Twitter. Your choice, just click where you need to to get an account.
3. Now, select and copy the URL you want to bookmark/save/shrink.
4. Return to bitly, past into the top spot.
5. Now this is what you will see.

Here you have some options. I recommend starting with "Add to bundle" This is a way you can organize all of your similar links (like organizing into folders, but they are called bundles)
Also, if you select View Stats you can click on the little QR and print that off to share.
As always, I like to keep it simple, short, and sweet. Bitly is an incredibly powerful tool that can really be used as a major time saver!! I also use it to create bundles for student work. For example, if I have a set of math sites I use for extra fun practice with students when they are finished with work, they are all stored together in a bundle labeled 5th grade interactive math sites. This way, I can quick run to the bundle and print/pull up a QR on the promethean board for the students to scan.
Saturday, February 8, 2014
Rocks or Sucks
Need to get your staff moving? Do they need to get out some tension or just need a chance to share their opinions. Use this!
1. Create a list of "hot topics" for staff to choose if they rock or suck- No in between.
2. One side of the room is "rocks", the other side is for "sucks"
3. State the topic, give 15 seconds for people to move, then give another 15 seconds for them to chat.
4. Then, each side gets a chance to share a reason why they chose rocks or sucks.
5. Repeat with a new topic.
I participated in a session like this at EdCampSTL and it was awesome! What a great way to get people up and moving, and talking! I think this would be awesome for a PLC meeting to allow teachers a chance to be heard. You could also use something similar in your classroom to give your students a voice.
Could you use this to create your classroom expectations?
What about your homework procedures?
What about the learning expectations?
Etc....
Monday, January 27, 2014
Free Cloud MacBook Back Up- 10 Minutes or Less!
Backing Up Your MacBook Files in the Google Drive Cloud

2. Double click on download

3. Click drag the google drive icon onto the folder icon

4. Go to Finder (click on your desktop) > Go (at the top in the menu bar) >Click on Applications > Double Click on Google drive

5. Click open

6. Click sign in now, go ahead and sign in with your google drive account

7. Click start sync

8. You may have to type in your MacBook user password
9. Now, a google drive folder will appear in your finder. Anything you drag there (hold down the option key- you will see a green plus sign appear then release) will be backed up into your drive account.


Thursday, January 23, 2014
FREE Photo Auto Cloud Back Up
FREE Auto- Cloud Back Up on Your iPhone, iPad
As always, I promise these steps are super quick and easy.. and incredibly functional as well! After following these few simple steps, your photos will auto-back up into the google + cloud. What this means is if your device gets run over by a car, your photos will all be saved, for FREE! Educationally, this means you have quick, easy access to photos your students take with their iPad for computer-based projects. (Tweet me if you’d like more ideas on this)
1. Go to https://plus.google.com
2. Sign in with your gmail, yahoo, or google account and upgrade to a Google + account (it’s free!)
3. Now, download the Google + app on your device (iPhone, iPad) - It’s available for free in the app store when you search for google plus

4. Open the app. Push “get started”

5. Now you can add your google + account that you want to use for auto back up.

6. Make sure the box that says back up existing photos and videos is checked, then select turn on auto back up.

If you already have the google + app and want to do an auto back up follow these directions:
1. Select the = on the upper left hand side of the screen (the app should be open, and you should be signed into your account)
2. Select the gear shifter button on the top right hand side to view your settings.

3. Select camera and photos.

4. Make sure Auto Backup is on.

Now you can view your photos by accessing your Google + account via the Internet.
Access your google plus account (if you aren't sure how to do this just google Google plus)
Click on the small square of 9 squares.
Click on Google +

On the left hand side scroll over where the page says home and some options will appear, click on photos.

Now you can download/organize your photos.
Tuesday, January 14, 2014
QR Quick Checks
Create Quick Checks for Students
Here is a quick, easy way to use QR codes to have students quickly check their work before completing an entire worksheet incorrectly. This also gives them an opportunity to get up and stretch their legs if you put the answer QR checks throughout the classroom.
1. Go to http://goqr.me
2. Type in the answer(s)/text you want for the 1st QR code.
*For example, you may have the answers to questions 1-3 inside the first QR for them to check after they have completed them. On your worksheet you can provide a little visual reminder for students to get up, stretch, and check their work.
3. Right click on the QR code, select copy.
4. Open up a word document, select paste.
5. Label the QR with answers 1-3 (or whatever fits what the QR scans to)
6. Return to the website, delete what you typed previously and repeat as needed.

Monday, January 13, 2014
Test Prep in the Computer Lab
Synonyms and Antonyms Computer Lab Lesson
1. Put students into groups of 5. Each student will need a computer.
2. Pick one person to be the scorekeeper of the group.
3. Have all students open up a Pages/Word document. If you are a google apps for education school I would recommend using a google doc and modifying the lesson a bit!
4. The scorekeeper will type a word.
5. The scorekeeper will say the word and each of the players will then type the word at the top of their page.
6. Now, each of the players will write down as many synonyms and antonyms as he/she can think of for that word. After 1 minute, the score keeper will yell time.
7. Now, each person reads his/her list out loud to the group. For each correct word the student gets a point. If a word used is neither an antonym or synonym, no point is given. (If the group disagrees, they need to look up the word(s) by using right click on the word(s) that need to be defined, then select the “look up” option to view the definition of the word-- on a MacBook the command for a "right click" or "drop down" is a two finger tap on the word)
8. Now, the kids rotate and a new score keeper is chosen. Continue to rotate until each member of the group has been the score keeper.
Here is a link you can give to students for a free timer.
http://www.online-stopwatch.com/countdown-timer/

Subscribe to:
Posts (Atom)